Arcane River Special Content
You can directly move to the information you want by searching it with [Ctrl + F].
Table of Contents
- About Arcane River Special Content
- Erda Spectrum
- Hungry Muto
- Dream Defender
- Spirit Savior
- Ranheim Defense
- Esfera Guardian
Boost your Arcane Power by gaining new and stronger Arcane Symbols through special content found on the Arcane River, including through Daily Quests and more! Learn more about Arcane Power and Symbols in the Arcane Power Maple Guide.
About Arcane River Special Content
There are 6 different pieces of special content in Arcane River:
- Vanishing Journey: Erda Spectrum
- Chu Chu Island: Hungry Muto
- Lachelein: Dream Defender
- Arcana: Spirit Savior
- Morass: Ranheim Defense
- Esfera: Esfera Guardian
Complete the region's story quests to gain access to the special content, which can be easily found and moved to via the Maple Guide [Default Hotkey: U].

Erda Spectrum
Nina, an investigator who observes and records the Erda around Vanishing Journey, has been injured and cannot complete her work. Help Nina with her investigation!
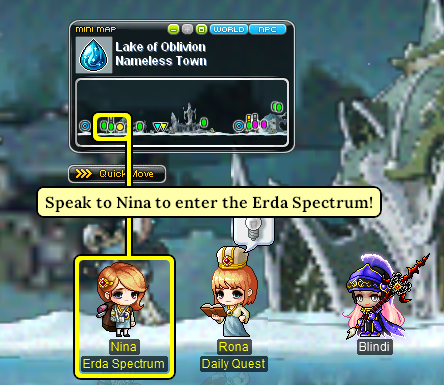
Only characters that are at least Lv. 200 and have completed the Vanishing Journey story quests can enter the Erda Spectrum content through Nina at Lake of Oblivion: Nameless Town.
- A party of up to 3 characters can enter.
- You can enter the Erda Spectrum up to 3 times a week.
How to investigate the Erda Spectrum
Work on the investigation by transferring extracted Erda by activating the Erda Extractor in the middle of the Oblivion's Embrace map. Erda can be extracted by defeating monsters on the map, and when you finish transferring Erda, it will automatically deactivate.
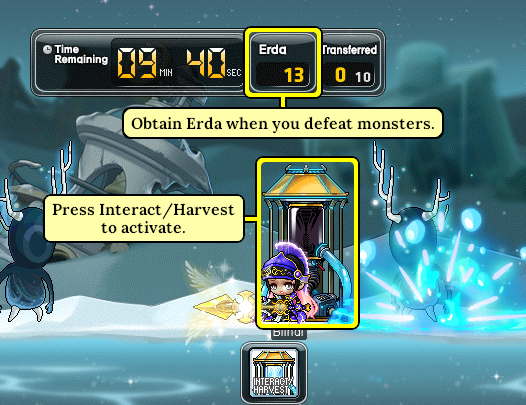
TIPS:
- The Erda Collector can be activated by using the Interact key.
- While the Erda Collector is activated, monsters will stop spawning.
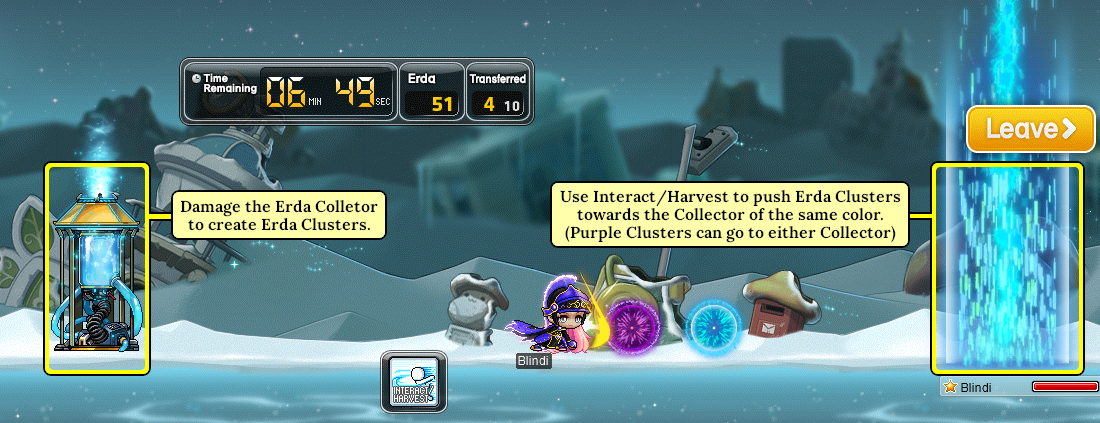
Once filled, you can strike the Erda Extractor to release an Erda Cluster, and the color of the Erda Cluster will be identical to the activated Erda Collector. Use the Interact key to push the Erda Cluster towards either portal on the side of the map to transfer. The transfer count increases by 1 when a Red or Blue Cluster is sent through a portal that matches its color, and by 2 when a Purple Cluster is sent through either portal. The investigation is concluded when the total transfer count reaches 10.
How to investigate the Land of Tranquility
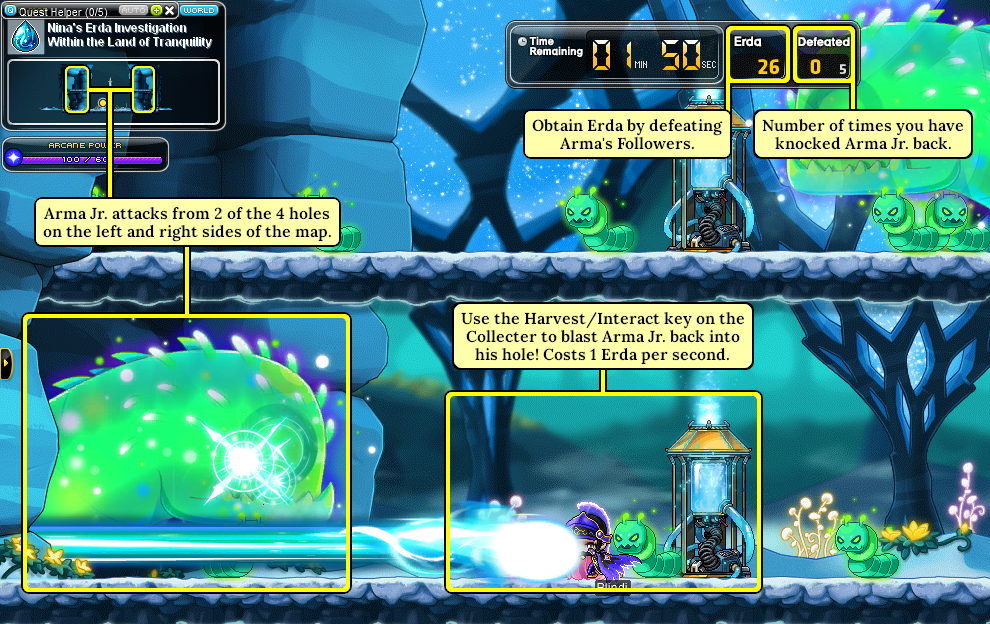
Arma Jr. randomly spawns from 2 of 4 holes located on both left and right sides of the map, and must be defeated 5 times within 2 minutes and 30 seconds, or the investigation will fail. Additionally, if Arma Jr. is able to reach the Erda Extractor, then the investigation will immediately fail, so keep on him.
You can earn Erda by eliminating Arma's Followers, which can then be spent to fire a powerful laser by pressing the Interact key on the Erda Extractor (consumed 1 Erda per second). The laser allows you to eliminate Arma Jr. by pushing him away from the Extractor, and he will be eliminated if he is pushed back into the hole.
TIP:
- Press ↑ on top of the Erda Extractors to move between the 1st and 2nd floors.
Erda Spectrum Reward
Upon clearing, you will receive EXP and Arcane Symbol: Vanishing Journey Coupon x15, regardless of the remaining Erda or time spent.
Hungry Muto
Gulla is on the march, and the only way to hold it at bay is with a well-fed Muto!
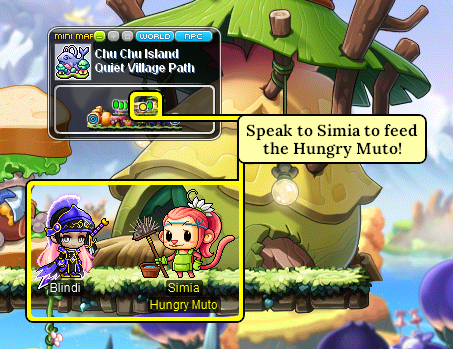
Only characters that are at least Lv. 210 and have completed the Chu Chu Island story quests can enter the Hungry Muto content through Simia at Chu Chu Island: Quiet Village path.
- A party of up to 4 characters can enter.
- You can enter Hungry Muto up to 3 times a week.
Ingredient Gathering
The fastest way to defeat Gulla is to make the food that Muto requests, and the best way to make that food is with very fresh ingredients!
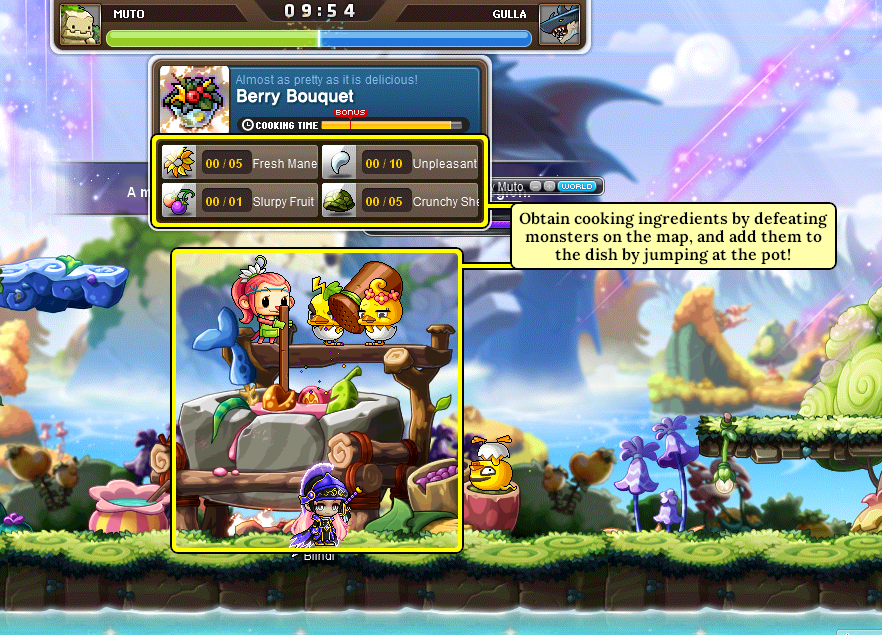
After you gather the appropriate ingredients by hunting down scattered monsters in the area, jump at the cooking pot to toss your ingredients in and let the chefs do their work!
Cooking Time
Each meal has a specified timer within which you must complete the meal. Finish gathering ingredients before the timer elapses to knock Gulla out!
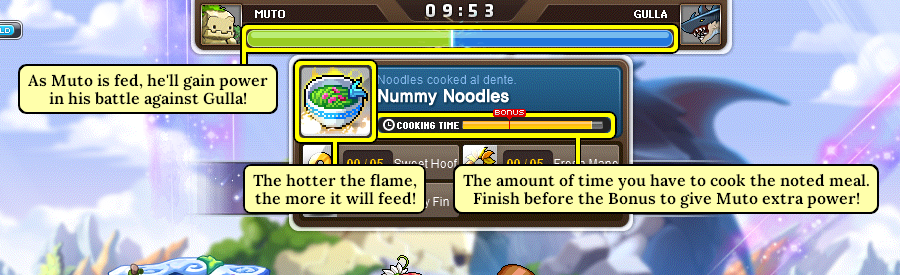
When Muto pushes Gulla out, the green gauge fills from left to right, while the blue gauge will fill up from right to left as Gulla starts to win. Completely fill the gauge with green to defeat Gulla!
The amount the gauge fills differs between meals and the complexity and number of their ingredients. The stronger the flame, the more difficult the meal, and the more power it will give to Muto when completed.
TIP:
- Complete the meal before the timer hits the Bonus marker in order to give Muto additional power on top of the meal's normal reward.
Cooking Recipes
| Item Name | Ingredients Needed, Quantity | Item Name | Ingredients Needed, Quantity |
|---|---|---|---|
| Fried Treat | Fresh Mane x10, Sweet Hoof x5 | Fried Squish | Zesty Mane x10, Spicy Hoof x5 |
| Savory Stir Fry | Greasy Peel x5, Soft Sole x10 | Dumpling Delights | Sour Peel x5, Chewy Sole x10 |
| Nummy Noodles | Savory Fins x10, Fresh Mane x5, Sweet Hoof x5 | Steamy Surprise | Crunchy Shell x10, Greasy Peel x5, Soft Sole x5 |
| Funky Pizza | Tart Fins x10, Zesty Mane x5, Spicy Hoof x5 | Juicy Buns | Soft Shell x10, Sour Peel x5, Chewy Sole x5 |
| Weird Wrap | Savory Fins x5, Fresh Mane x5, Slimy Feather x10 | Yucky Pickles | Soft Shell x5, Zesty Mane x5, Sticky Feather x10 |
| Gamey Soup | Savory Fin x 5, Unpleasant Talon x10, Crunchy Shell x5 | Chewy Porridge | Tart Fins x5, Chewy Talon x10, Soft Shell x5 |
| Mystery Roast | Slurpy Fruit x1, Slimy Feather x10, Greasy Peel x5, Soft Sole x5 | Fruit Salad | Slurpy Fruit x1, Sticky Feather x10, Sour Peel x5, Chewy Sole x5 |
| Berry Bouquet | Slurpy Fruit x1, Unpleasant Feather x10, Fresh Mane x5, Crunchy Shell x5 | Spicy Sausage | Zesty Mane x5, Chewy Talon x10, Soft Shell x5 Slurpy Fruit x1 |
Hungry Muto Rewards:
Completing Hungry Muto will reward Maplers with EXP and Arcane Symbol: Chu Chu Island Coupon x15.
Midnight Chaser
Break the Nightmare Music Boxes in Lucid's subconscious to prevent Lucid's nightmare enveloping Lachelein!
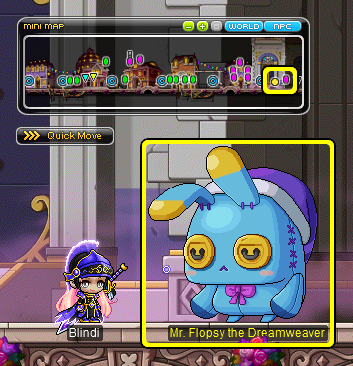
Only characters that are at least Lv. 220 and have completed the Lachelein story quests can enter the Midnight Chaser content through Mr. Flopsy the Dreamweaver at Lachelein: Lachelein Main Street.
- Content can only be done solo, outside of a party.
- You can enter Midnight Chaser up to 3 times a week.
Midnight Chaser Rules
Damage the Nightmare Music Boxes to restore them as Sleepytime Music Boxes and prevent Lucid's nightmare from going out of control!

The more Nightmare Music Boxes there are in the 5 rooms, the more the gauge fills with purple. The more Sleepytime Music Boxes there are, the more it fills with yellow. Fill the bar with yellow within 3 minutes by having more Sleepytime Music Boxes active than Nightmare Music Boxes to clear the current stage and move onto the next stage!
Dream Points and Skills
You obtain Dream Points every time you clear a Midnight Chaser stage, and you can consume them to power Dream Skills. You receive an additional 10 Dream Points for every 10 stages and can accumulate up to 3,000 points.

The following skills can be used by consuming Dream Points.
| Skill Name | Consumed Dream Points | Description |
|---|---|---|
| Gauge Freeze | 200 | Stops the gauge from moving for 5 sec. |
| Wake-up Call | 300 | Remove a random Nightmare Music Box. |
| Call Mr. Flopsy | 400 | Calls Mr. Flopsy to provoke nearby monsters. |
| Kaboom | 900 | Destroys all monsters and prevents them from re-spawning for 10 sec. |
Use these abilities wisely, as you cannot use the same ability twice on a single stage!
Midnight Chaser Rewards
Completing Hungry Muto will reward Maplers with EXP and Arcane Symbol: Lachelein Coupon x15.
Spirit Savior
Rescue the spirits who couldn't escape!
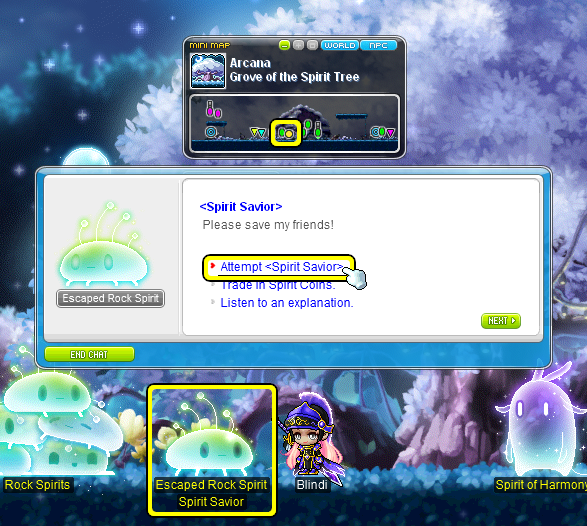
Only characters that are at least Lv. 225 and have completed the Arcana story quests can enter the Spirit Savior content through the Escaped Rock Spirit at Arcana: Spirit Tree.
- Content can only be done solo, outside of a party.
- You can enter Spirit Savior up to 3 times a week.
Spirit Savior Rules
Save as many Bound Rock Spirits as you can before time runs out!
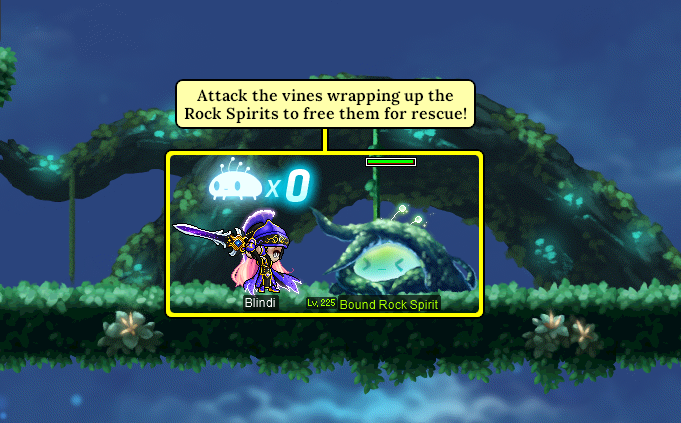
Save Bound Rock Spirits by damaging their bonds and using the Interact key to get them to accompany you. You can have up to 5 Rock Spirits accompanying you and you will earn Rescue Points when you bring them back to the safe zone.
The more Rock Spirits you rescue at once, the more points you'll get.
| Rock Spirits Rescued at Once | Points Obtained |
|---|---|
| 1 Rock Spirit | 200 points |
| 2 Rock Spirits | 500 points |
| 3 Rock Spirits | 1,000 points |
| 4 Rock Spirits | 1,500 points |
| 5 Rock Spirits | 2,500 points |
Obstacles

After a certain amount of time, Spirit Fragments will show up throughout the map. If they hit you, you'll lose some defense and the Spirit Fragment will disappear.
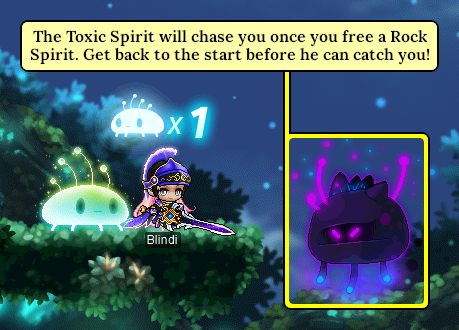
When you start to rescue Rock Spirits, the Toxic Spirit will begin to chase you, and it grows larger and faster with the more Rock Spirits you have with you. If the Toxic Spirit manages to reach you, you'll lose all of the Rock Spirits accompanying you.
TIPS:
- The Toxic Spirit disappears when you safely bring the Rock Spirits accompanying you back to the safe zone for rescue.
- The Toxic Spirit will then resume chasing you again once you start rescuing a new Rock Spirit.
Map Structure
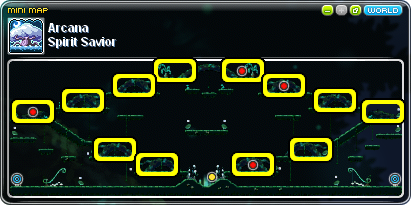
The Spirit Savior map is left-right symmetrical. Bound Rock Spirits can appear from a total of 12 locations, but only 4 will appear at once.
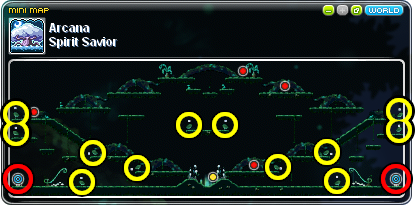
There are a total of 12 launchers and 2 portals in the Spirit Savior map. When you use a portal, it will move you to a random platform on the map, and the launchers will send you flying in the direction they face. Use these portals and the launch platforms to stay away from the Toxic Spirit and save the Rock Spirits!
Spirit Savior Reward
Completing Spirit Savior will reward Maplers with EXP and Arcane Symbol: Arcana Coupon x15.
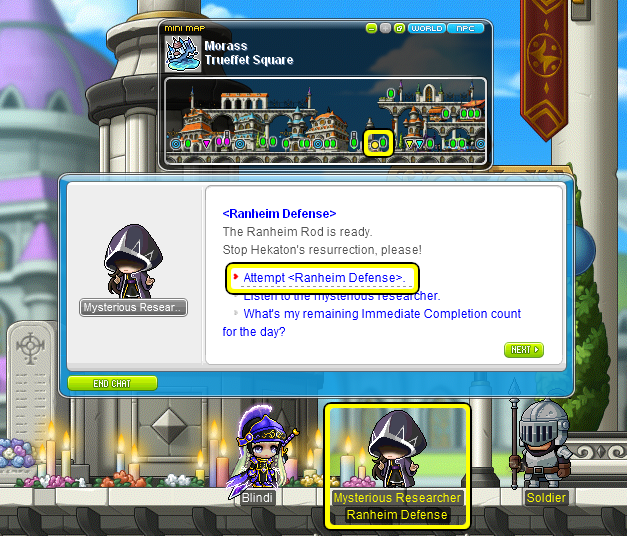
Ranheim Defense
Use the Ranheim Rod and thwart the attempt to resurrect Hekaton! Speak to the Mysterious Resercher in Trueffet Square to start the mission.
The Ranheim Rod is ready to block Hekaton's resurrection, but the forces of darkness are on the scene to stop it. Enter battle and defeat the monsters contesting the area to build up Light Magic, tracked at the top of the UI!
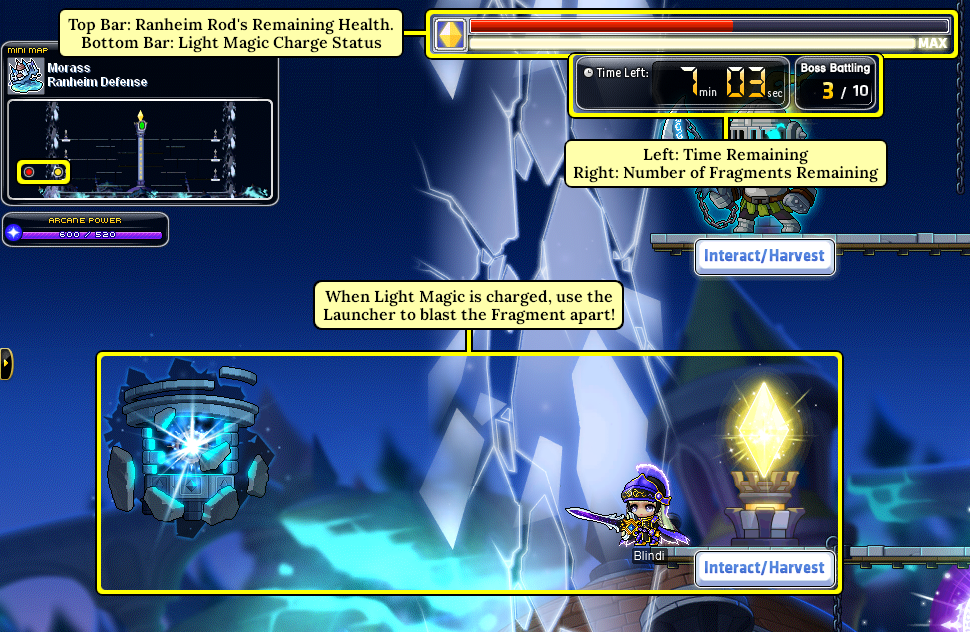
As you fight, Body Fragments will appear, attacking the Ranhein Rod in an effort to cease its meddlesome interference. Once you've charged a sufficient amount of Light Magic, use the Light Magic Launcher closest to the Body Fragment to send a blast of light to destroy it!
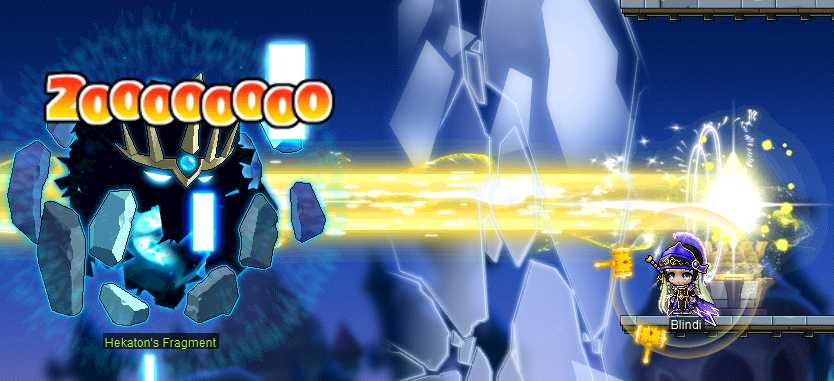
Once you've defeated 9 Body Fragments, Hekaton's Fragment will appear. Three blasts from the Light Magic Launchers will be needed to destroy the Fragment and claim victory, but the fragment won't stay still, teleporting to a new location after each strike. Move fast, fight fast, and defeat the final fragment before the Ranhein Rod can be destroyed or time expires!
Ranheim Defense Reward
Completing Ranheim Defense will reward Maplers with EXP and Arcane Symbol: Morass Coupon x15.
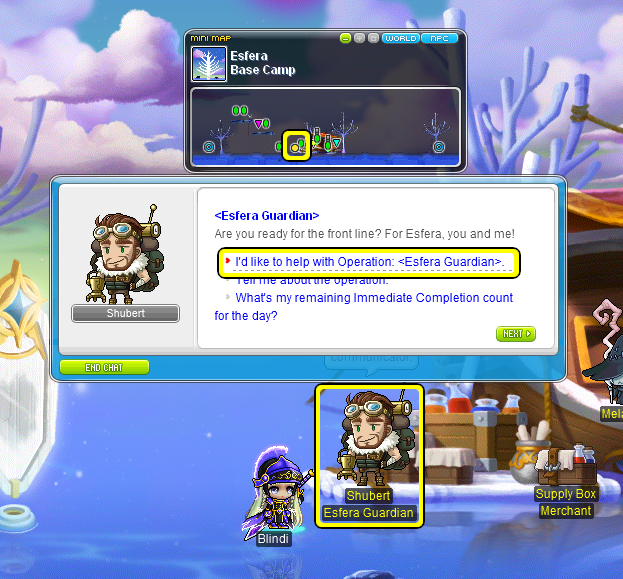
Esfera Guardian
Twisted Dimensional Gates have appeared in Esfera, threatening the Esfera Base Camp, hop on Shubert's Special Turret and turn those distortions of reality to pieces! Speak to Shubert in the Esfera Base Camp to join the battle.
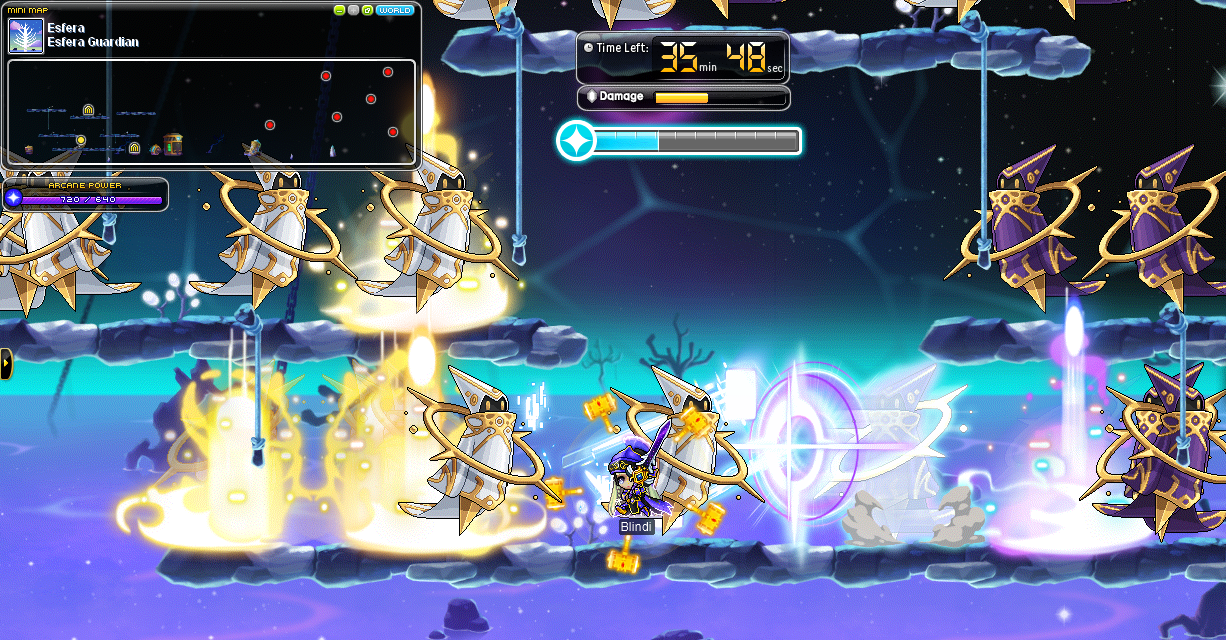
The only weapon powerful enough to destroy the Twisted Dimensional Gates is Shubert's Special Turret, which requires a healthy amount of Erda in order to operate. Thankfully, a crowd of Light and Dark Executors on the left side of the map, powerful creatures positively brimming with Erda! Defeat them to charge up the turret!
Shubert's Special Turret can hold up to ten charges, so once you've defeated enough monsters, use the Sit command to sit down at the turret and prepare to open fire. Shubert's Special Turret has two different firing modes:
- Erda Shell (selected with 'A'): Fires an arcing shot that will detonate on contact with a Dimensional Gate, falling under the effect of gravity. Consumes 1 charge.
- Super Erda Shell (selected with 'S'): Fires a straight shot that will detonate against a Dimensional Gate, with the path of the shot being shown on screen. Does not arc. Consumes 3 charges.
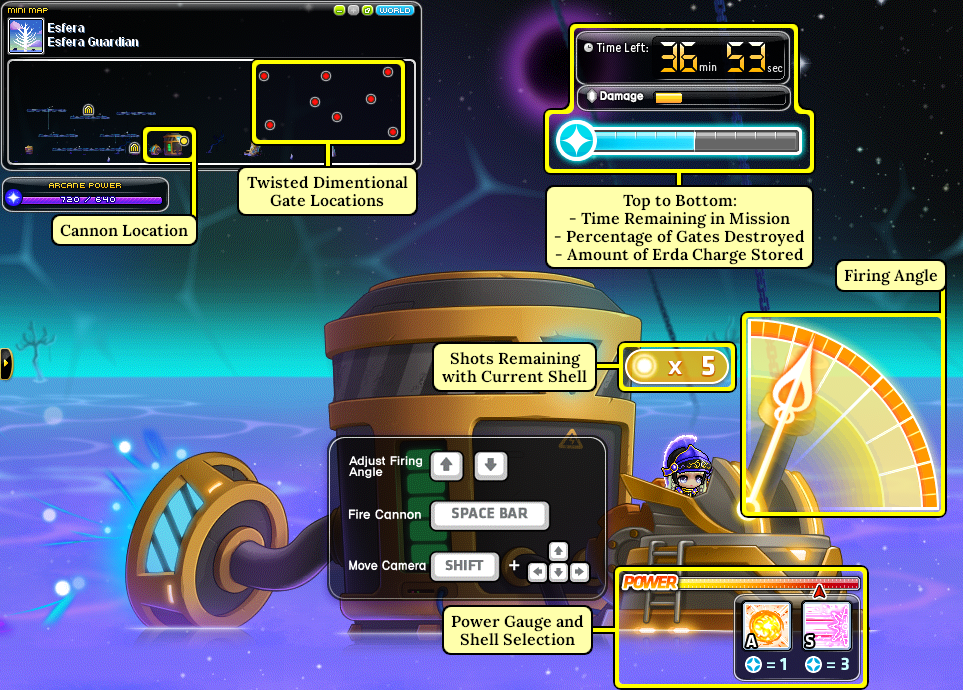
After three minutes on the map, Executors may also start dropping Shubert's Support Shot items, which when picked up will immediately destroy two Twisted Dimensional Gates. Defeat the Executors, take careful aim with the turret, and clear out all ten Twisted Dimensional Gates to win!
Esfera Guardian Reward
Completing Esfera Guardian will reward Maplers with EXP and Arcane Symbol: Esfera Coupon x15.